Issuing W3C Credentials after filling out a Form
The guide we assume that a Credential should be issued to someone after filling out a form. The form should include a name and email Address as well as secret-key which we assume must be validated.
Prerequisites
Setting up an Issuing DID
Before you can issue credentials, you need to set up an DID which is published on chain which does contain an Issuing key. A issuing key is a key pair which is used to sign the credentials. In the DID-Document an issuing key can be identified by the assertionMethod property. The Create and Update DID guide goes over the process of creating a DID and adding an issuing key to it. From a pure technical perspective an key inside the assertion-Method property it not different from a key inside the authentication property. The only difference is that the key inside the assertionMethod property is used to sign credentials by definition. For more details on how the DID is setup have a look at the DID specification and also at the PRISM DID specification. In prior version of Identus the issuing-key was also named e.g. issuingKey-1 to better identify it.
If you already followed the Create and Update DID guide you can skip this step, as the DID is already created and the issuing key is linked in the tenant. Otherwise:
- Go to to the profile page and select the Issuing Keys tab. For more information on the Issuing Keys, please refer to the Issuing Keys Settings documentation.
- Enter the following values:
- A name of your choice for the issuing key
- The DID identitifer like
did:prism:6b7c5e9dd3c0d5bae65d21ea26fe452cf05ste36f1b7454aeb2b8e1ecd0c764eca) - The KeyType which must be set to secp256k1
- The PublicKey which is the x and y values from the previous step (“two part variant” / “uncompressed variant”). For example
rS0gI6S32Vt_9wO_mhO820oAib86X5xKEiZyUanpxSwgl-w_gJX4CbQmgW6BDoKXbdLVf5MQkwUStOk6n8TnG0
- The PrivateKey which is the d value from the previous step. In this example:
02nnKLLcs9weejHteLuLryrVTQ6R1ffPU_9DP3qj5dUThis Issuing-Key-pair will later allow us to issuing a W3C Verifiable Credential.
Note: That the private key is stored in the system for this tenant. Do not use hosted version of the OPN instance for production purposes, as this may expose your private keys to unauthorized access. For further details go to the Issuing Keys Settings documentation.
Workflow setup
Create a new workflow
- Go to the Workflows tab and click on the Create New Workflow button.
- In the top left rename and Workflow to your liking. For example
Issuing Credential.
Choose the Form-trigger
The form trigger is triggered if a used fills out form and clicks on the submit button. For more details on the form trigger, see the Form Trigger documentation.
- Select the Form Trigger from the list of available triggers (under the Manual triggers tab).
- Give the Form a title for the user to see e.g. “Blocktrust University Certification”
- Add a description for the user to see e.g. “Please fill out the form to receive your degree as a Verifiable Credential”
- Add Name as a field. Also enter a description like “Please enter your name”
- Add DID as a field. Also enter a description like “Please enter your DID to ensure the credential is issued to you”
- Add Code as a filed. Also enter a description like “Please enter the code given to you after graduation”
- Add Email as a field. Also enter a description like “Please enter your email to receive the credential”
Perform a Validation
Before creating and sending out the credential we want to validate the secret-key. We can do so by using the very flexible Custom Validation Action. The Custom Validation Action allows you to perform a validation on the input of the form. In this case we want to check if the code is one of three valid codes.
- Select the Custom Validation Action from the list of available actions (under the Validation Actions tab).
- As the Data Soruce select the From Trigger and the Code field.
- Add a new Validation Rule with the following values:
- Name: Code must match
-
Validation Expression: ["ABC123", "SuperSecret", "DoNotShare"].includes(data.value). Since we are writing Javascript code we could for example achive the same result by this expression: ` data.value === “ABC123”data.value === “SuperSecret” data.value === “DoNotShare”`. - Error Message: “The code is not valid. Please contact the university.”
- Leave the Error Handling “Stop Workflow” selected. This means that if the validation fails, the workflow will stop and no credential will be issued.
Create the Credential
Next we to create the credential. For this we will us the Issue W3C Credential Action. The Issue W3C Credential Action allows you to create a W3C Verifiable Credential, and sign it with the Issuing key.
- Select the W3C VC Action from the list of available actions (under the Issue credentials tab).
- For the Subject DID field, select From Trigger and the DID field. This means that the credential will be issued to the DID entered in the form. You could have added an additional validation step to check if the DID is a valid format e.g. using regex in the prior step, but in case for the subject a Prism DID is not needed, it could even be some kind of other identifier (from a pure technical perspective).
- For the Isserier DID select the Issue which we setup earlier in the Prerequisites section.
- For Valid until select the date when the credential should expire. For example 1 year from now.
- Then click Add Claims to add a few claims:
- For the first claim type
nameand select From Trigger and the Name field. - For the second claim type
degreeand select Static and type something likeCompletion of the Blocktrust course.
- For the first claim type
Send Credential
Lastly we want to send the Credential to the email provided by the user. For this we will use the Send Email Action. The Send Email Action allows you to send an email to the user with the credential attached.
- Select the Email Action from the list of available actions (under the Communications tab).
- For the To field, select From Trigger and the Email field. This means that the email will be sent to the email entered in the form.
- For the Subject field, enter a subject for the email. For example
Your Blocktrust University Credential. - For the Body field, enter a message for the email. For example
Congratulations {{name}}! You have completed the Blocktrust course. Please find your credential here: {{credential}}. - Since we used parameters in the body we need to sepcify the source of the parameters:
- Add a new Parameter. The name is
nameand the source is From Trigger and the Name field. - Add a new Parameter. The name is
credentialand the source is Action Outcome and the Issue W3C Credential. This means that the credential will be attached to the email.
- Add a new Parameter. The name is
- Click on Save to save the workflow.
Testing the Workflow
The setup is now complete. After saving click on the Run button to enable the workflow. Next we need to go back to the Form Trigger and copy out the Form Url. Open the form in a browser. This may look like this: 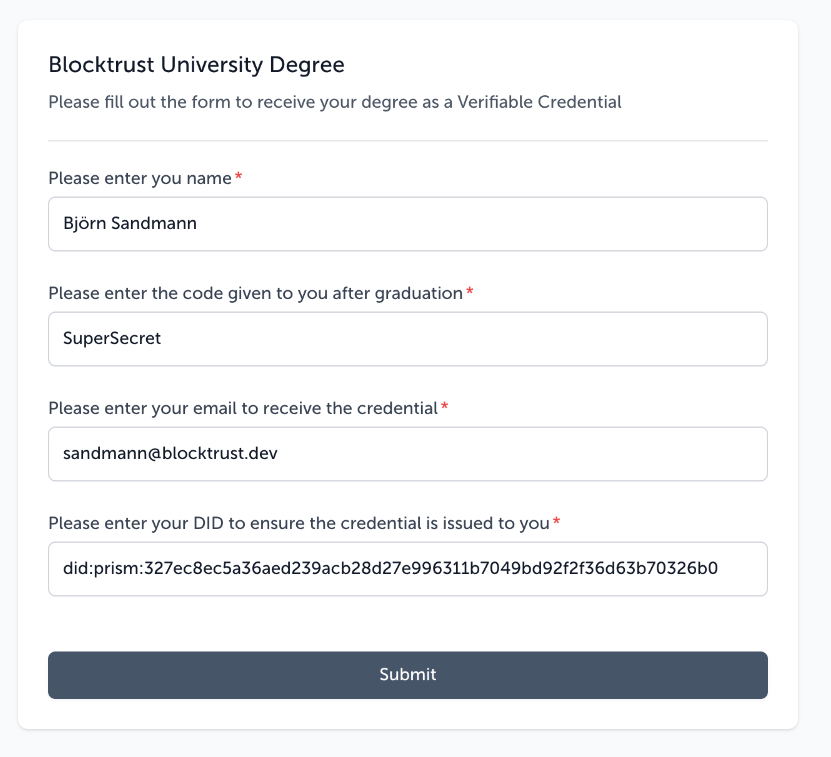
Shortly after submitting the form you should receive an email with the credential attached. The email may look like this:
Congratulations Björn Sandmann! You have completed the Blocktrust course. Please find your credential here:

eyJhbGciOiJFUzI1NksiLCJ0eXAiOiJKV1QifQ.eyJpc3MiOiJkaWQ6cHJpc206NmI3YzVlOWRkM2MwZDViYWU2NWQyMWVhMjZmZTQ1MmNmMDVlMzZmMWI3NDU0YWViMmI4ZTFlY2QwYzc2NGVjYSIsInN1YiI6ImRpZDpwcmlzbTozMjdlYzhlYzVhMzZhZWQyMzlhY2IyOGQyN2U5OTYzMTFiNzA0OWJkOTJmMmYzNmQ2M2I3MDMyNmIwNDc0NWI1IiwidmMiOnsiQGNvbnRleHQiOlsiaHR0cHM6Ly93d3cudzMub3JnLzIwMTgvY3JlZGVudGlhbHMvdjEiXSwidHlwZSI6WyJWZXJpZmlhYmxlQ3JlZGVudGlhbCJdLCJpc3N1ZXIiOiJkaWQ6cHJpc206NmI3YzVlOWRkM2MwZDViYWU2NWQyMWVhMjZmZTQ1MmNmMDVlMzZmMWI3NDU0YWViMmI4ZTFlY2QwYzc2NGVjYSIsImV4cGlyYXRpb25EYXRlIjoiMjAyNi0wNS0xNlQyMzo1OTo1OS45OTk5OTk5IiwidmFsaWRGcm9tIjoiMjAyNS0wNS0xNlQxNzowNjowMi42ODk3OTU0IiwiY3JlZGVudGlhbFN1YmplY3QiOnsiaWQiOiJkaWQ6cHJpc206MzI3ZWM4ZWM1YTM2YWVkMjM5YWNiMjhkMjdlOTk2MzExYjcwNDliZDkyZjJmMzZkNjNiNzAzMjZiMDQ3NDViNSIsIm5hbWUiOiJCalx1MDBGNnJuIFNhbmRtYW5uIiwiZGVncmVlIjoiQ29tcGxldGlvbiBvZiB0aGUgQmxvY2t0cnVzdCBjb3Vyc2UifX0sIm5iZiI6MTc0NzQwNzk2MiwiZXhwIjoxNzc4OTY4Nzk5fQ.8JS9gtzw4dxa1j03yRgz4SWlmgSw9NFDWVy83YYFz8Hn-puUC29zdwT_R5DNLwWWhukNYdLTM-e9VJKD6kNLEA
This completes the second part of the guide. If you want to learn about credential verification, please continue to the Verifying Credentials guide.